Back Rear Camera Replacement for iPhone 6Plus with Repair Tools, GVKVGIH OEM Back Camera Module Flex Cable for iPhone 6P
color:
  • iPhone 6Plus
Retail Price: $ 13.99
Wholesale Price: Inquire Now
1

About GVKVGIH

Gvkvgih is a young brand which mainly specialize in dual sim card adapter for smartphone, opensource hardware, electronic components and different kinds of DIY tools and kits.

Package included:

1 x Brand New OEM Back Rear Camera module for iPhone 6Plus

1 x Clean Wiper with "GVKVGIH" LOGO

A pack of open tool kit for iPhone(10 piece)

Kindly Noted:(Important!!)

1.Before disassembling your iPhone, discharge the battery below 25%. A charged lithium-ion battery can catch fire and/or explode if accidentally punctured.

2.Power off your iPhone before beginning disassembly

1

How to Replace Your Broken Back Camera

1,Power off your iPhone. Remove the two Pentalobe screws, located at the bottom of the iPhone, next to the lightning connector.

2,Use a Heat Gun or Hair Dryer, to apply mild heat to the lower edge of the iPhone, for approx. one minute.

3,Apply a suction cup to the lower left corner of the display assembly.Pull up on the suction cup with firm, constant pressure, to create a slight gap between the front panel and rear case.Place the flat edge of a spudger into the gap between the screen and rear case, directly above the headphone jack, and twist the spudger to widen the gap.Slide the spudger up the side of the phone to separate the adhesive and free the clips

4,Pull up on the suction cup to lift up the display and open the iPhone.Slide an opening pick underneath the display along the top edge of the phone to loosen the last of the adhesive.

5,Open the display to about a 90º angle, and lean it against something to keep it propped up while you're working on the phone.

6,Remove the following Phillips screws from the battery connector bracket,and remove the metal battery connector bracket from the iPhone.

7,Use a clean fingernail or the edge of an opening tool to gently pry the battery connector up from its socket on the logic board.

8,Remove the following Phillips screws securing the front panel assembly cable bracket and remove the front panel assembly cable bracket from the logic board.

9,While still supporting the front panel, use a fingernail or the edge of an opening tool to disconnect the front-facing camera and earpiece speaker connector.Disconnect the home button cable connector.Use a plastic opening tool to disconnect the display data cable connector.Finally, disconnect the digitizer cable connector.

10,Remove the front panel assembly from the rear case.

11,Use a pair of tweezers to peel back the piece of tape covering the hidden screw securing the rear-facing camera bracket to the rear case.

12,Remove the following screws securing the rear-facing camera bracket to the rear case

13,Lift and remove the rear-facing camera bracket off the rear-facing camera.

14,Use the flat end of a spudger to disconnect the rear-facing camera connector from its socket on the logic board.

15,Carefully lift and remove the rear-facing camera out of the iPhone.

This website follows the safe harbor principle. If any infringement, please inform us in time and we will delete it in time. About safe harbor,please click here to learn more.
...
After Sale Service:
1 Insurance Policy: Click to go to the Help Center to view the Insurance Policy
2 The rules apply and summit for receive compensation
3 The conditions of accrual for amount insurance
5 Damage to the parcel during international shipping, which resulted in damage to the goods in it
6 Loss of individual goods under international shipment The absence individual goods in the parcel
7 Non-compliance individual goods in color, size, complications Damage to the goods during international shipment
8 Returns Policy: Click to go to the Help Center to view the Returns Policy
...
...
Back Rear Camera Replacement for iPhone 6Plus with Repair Tools, GVKVGIH OEM Back Camera Module Flex Cable for iPhone 6P

BEST SELLERS

...

Product Description

1

About GVKVGIH

Gvkvgih is a young brand which mainly specialize in dual sim card adapter for smartphone, opensource hardware, electronic components and different kinds of DIY tools and kits.

Package included:

1 x Brand New OEM Back Rear Camera module for iPhone 6Plus

1 x Clean Wiper with "GVKVGIH" LOGO

A pack of open tool kit for iPhone(10 piece)

Kindly Noted:(Important!!)

1.Before disassembling your iPhone, discharge the battery below 25%. A charged lithium-ion battery can catch fire and/or explode if accidentally punctured.

2.Power off your iPhone before beginning disassembly

1

How to Replace Your Broken Back Camera

1,Power off your iPhone. Remove the two Pentalobe screws, located at the bottom of the iPhone, next to the lightning connector.

2,Use a Heat Gun or Hair Dryer, to apply mild heat to the lower edge of the iPhone, for approx. one minute.

3,Apply a suction cup to the lower left corner of the display assembly.Pull up on the suction cup with firm, constant pressure, to create a slight gap between the front panel and rear case.Place the flat edge of a spudger into the gap between the screen and rear case, directly above the headphone jack, and twist the spudger to widen the gap.Slide the spudger up the side of the phone to separate the adhesive and free the clips

4,Pull up on the suction cup to lift up the display and open the iPhone.Slide an opening pick underneath the display along the top edge of the phone to loosen the last of the adhesive.

5,Open the display to about a 90º angle, and lean it against something to keep it propped up while you're working on the phone.

6,Remove the following Phillips screws from the battery connector bracket,and remove the metal battery connector bracket from the iPhone.

7,Use a clean fingernail or the edge of an opening tool to gently pry the battery connector up from its socket on the logic board.

8,Remove the following Phillips screws securing the front panel assembly cable bracket and remove the front panel assembly cable bracket from the logic board.

9,While still supporting the front panel, use a fingernail or the edge of an opening tool to disconnect the front-facing camera and earpiece speaker connector.Disconnect the home button cable connector.Use a plastic opening tool to disconnect the display data cable connector.Finally, disconnect the digitizer cable connector.

10,Remove the front panel assembly from the rear case.

11,Use a pair of tweezers to peel back the piece of tape covering the hidden screw securing the rear-facing camera bracket to the rear case.

12,Remove the following screws securing the rear-facing camera bracket to the rear case

13,Lift and remove the rear-facing camera bracket off the rear-facing camera.

14,Use the flat end of a spudger to disconnect the rear-facing camera connector from its socket on the logic board.

15,Carefully lift and remove the rear-facing camera out of the iPhone.

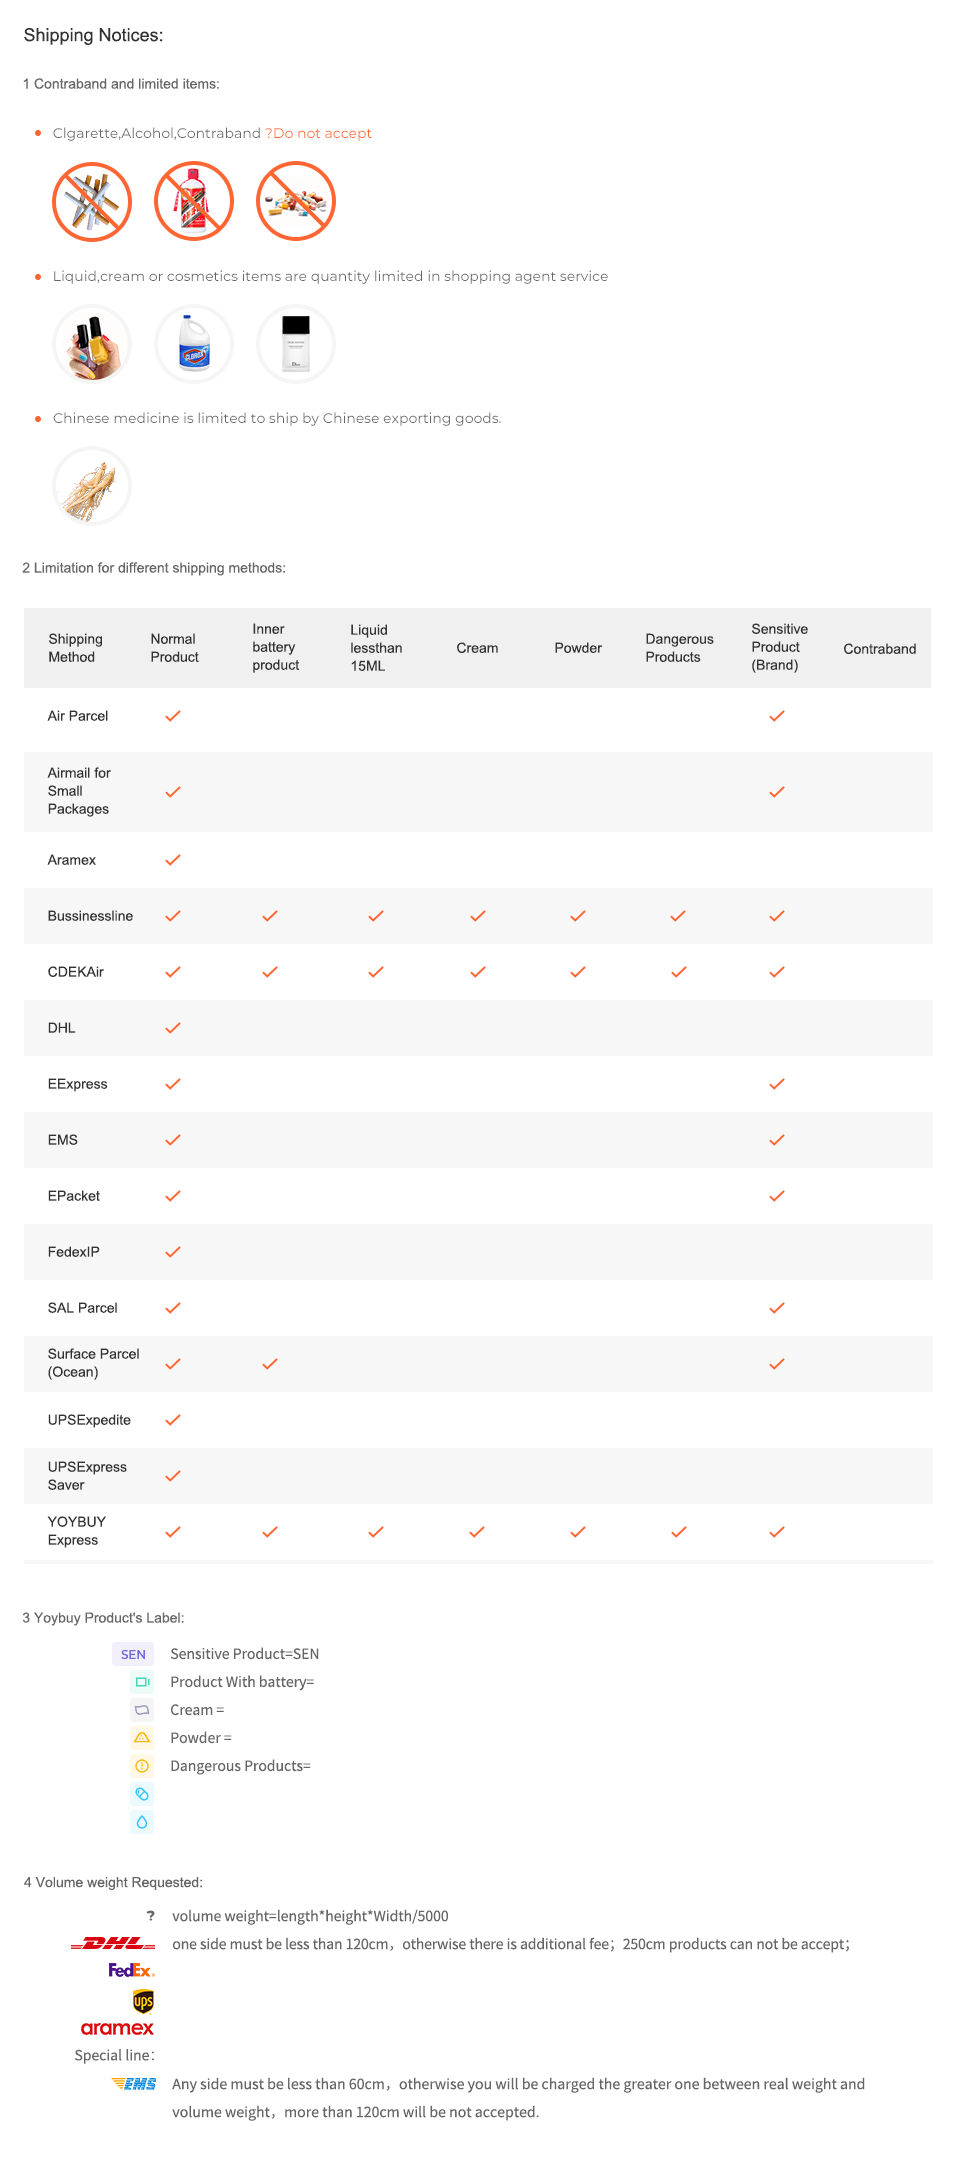
Shipping Notices:
1 Contraband and limited items:
Clgarette,Alcohol,Contraband ?Do not accept
... ... ...
Liquid,cream or cosmetics items are quantity limited in shopping agent service
... ... ...
Chinese medicine is limited to ship by Chinese exporting goods.
...
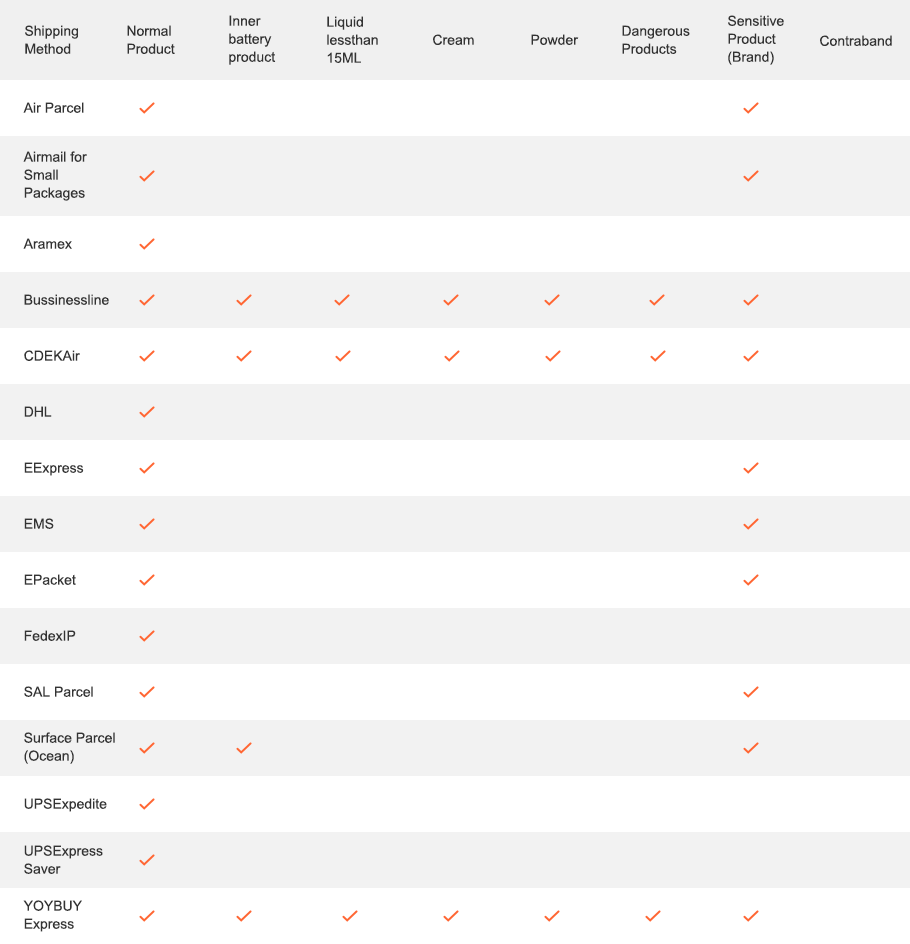
2 Limitation for different shipping methods:
...
3 Yoybuy Product's Label:
...
Sensitive Product(SEN)
...
Product With battery
...
Cream
...
Powder
...
Dangerous Products
...
....
4 Volume weight Requested:
...
volume weight=length*height*Width/5000
...
one side must be less than 120cm,otherwise there is additional fee;250cm products can not be accept;
...
...
...
...
...
Any side must be less than 60cm,otherwise you will be charged the greater one between real weight and volume weight,more than 120cm will be not accepted.
After Sale Service:
2 The rules apply and summit for receive compensation
3 The conditions of accrual for amount insurance
5 Damage to the parcel during international shipping, which resulted in damage to the goods in it
6 Loss of individual goods under international shipment The absence individual goods in the parcel
7 Non-compliance individual goods in color, size, complications Damage to the goods during international shipment
...

BEST SELLERS

Inquire Now
X

Contact us now

Language

Currency

    Upload image to find the same item

    Drag the image here, or Click to upload Tips: Only jpg, jpeg, png, webp

    Scan the QR code and use your phone to take a direct photo search.

    ×