


- SIZE: 22\" Height x 16.25\" Wide x and 13\" Deep
- FAST SHIPPING: We paint each piece custom to order and ship within 2-4 business days.
- ARTISTICALLY CRAFTED: Each deer head mount is made of resin and then hand painted custom to order from our studio in Stewartstown, PA. 100% cruelty-free.
- EASY MOUNTING: The antlers are removable. Simply add glue and attach! Then hang from the built-in keyhole on the back.
- SUPERIOR CUSTOMER SERVICE: If you have an issue with your order or need assistance making a purchase decision, message us to contact our owner directly.


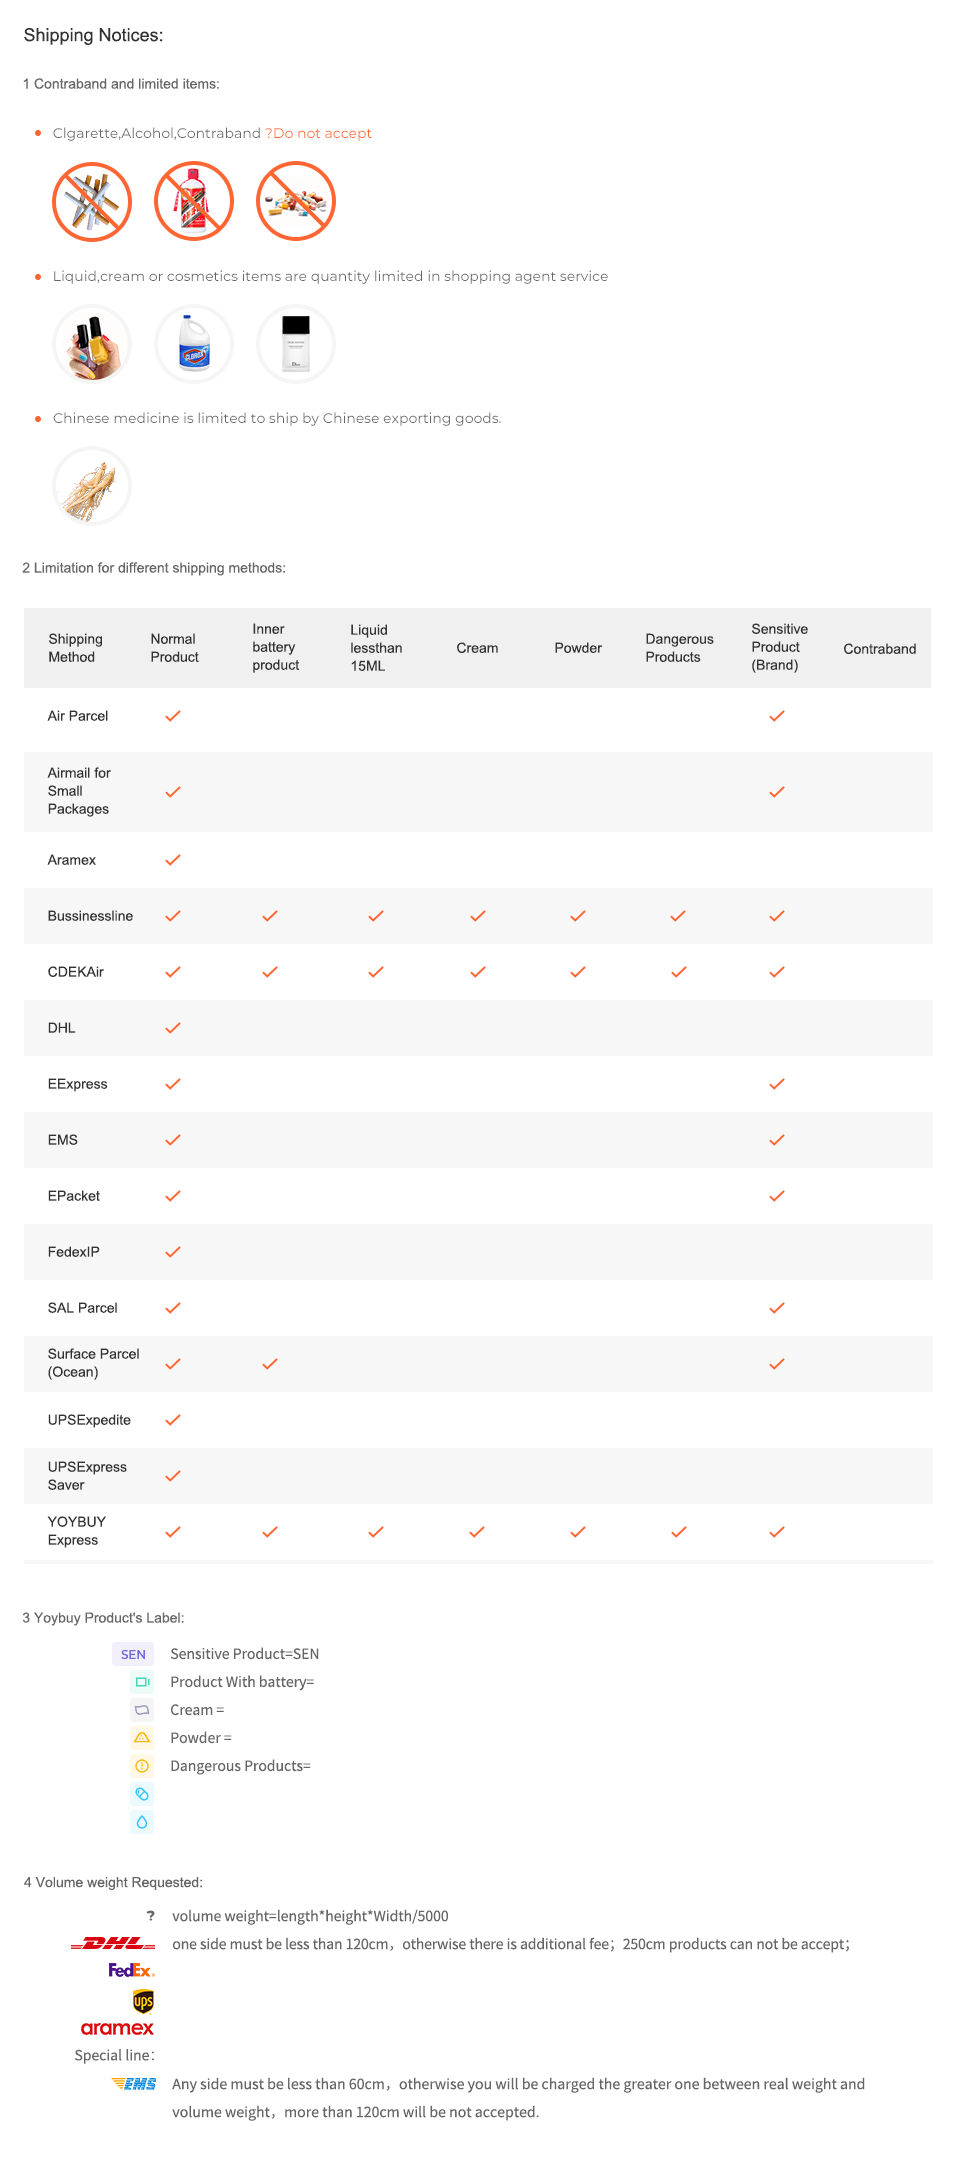
Faux Taxidermy Wall Decor - 100% Cruelty-Free
Our faux animal heads are inspired by nature. Each piece is a realistically detailed replica of an animal you’d see in the wild, but are 100% cruelty-free. This deer head has been molded from resin and shows each grain of hair on the deer's face and neck. The antlers are also crafted from resin, but are realistically detailed. We then hand paint each deer head custom to order in our Stewartstown, Pennsylvania studio. Go faux, and be proud to display your new deer friend!

Easy Assembly and Hanging Instructions
1. Line up the Antlers Each antler is labeled with an "R" (right) or "L" (left), which are from the perspective of looking at the deer head-on as if it were hanging on the wall. Lay your deer down and place the right antler in the right antler hole and the left antler in the left hole.
2. Glue Antlers in Place (Optional) We highly recommend that you glue your deer's antlers in place before hanging it. This step is especially important if you're hanging it in a high traffic area or above furniture.
3. Screw into Wall All you need is a strong screw and screw driver (not included). Use a screw over 1" long that has a head that will fit in the keyhole on the back of the deer. It is best to put it in the stud of the wall.
4. Hang Each of our faux animal heads comes with a keyhole on the back. Place the keyhole over the screw that you inserted in step 3.
5. Admire Woohoo! Give yourself a pat on the back and then snap a photo to show off your new deer head to your friends.
Wall Decor to Bring Life to Any Room in Your Home
|

|

|

|
|---|---|---|
Beautiful Bedroom DecorOur faux deer head adds interest to your room. With a variety of colors, you can select the color combination that best matches your decor. Or, opt for a simple white deer head to match with your changing taste. |
Living Room Wall DecorA faux taxidermy deer head hanging in your living room is sure to spark the attention of your guests! Hang it above a book case, china cabinet, comfy sofa, or fireplace mantle to add dimension in a seamless way. |
Baby Nursery Focal pointEvery woodland themed baby nursery needs a faux animal head. Our 8 point deer head adds interest to your walls and will be the beginning of your baby boy or girl's love of animals. |

8 Point Deer Head Measurements
Measurements include Antlers
- 22" tall
- 16.25" wide
- 13" deep
Key Features
- Made of resin (hard surface)
- Removable antlers for storage and shipping
- Hand-painted with love in Stewartstown, PA
- Custom made to order (2-4 business day production time)
- Keyhole on back for easy mounting

|

|

|

|
|
|---|---|---|---|---|
| 8 Point Deer | 14 Point Deer | Mini Deer | Moose Head | |
| Height (including antlers) | 22 inches | 21 inches | 15 inches | 21.5 inches |
| Removable antlers | ✓ | ✓ | ✓ | ✓ |
| Keyhole for easy mounting | ✓ | ✓ | ✓ | ✓ |


BEST SELLERS

Product Description
Faux Taxidermy Wall Decor - 100% Cruelty-Free
Our faux animal heads are inspired by nature. Each piece is a realistically detailed replica of an animal you’d see in the wild, but are 100% cruelty-free. This deer head has been molded from resin and shows each grain of hair on the deer's face and neck. The antlers are also crafted from resin, but are realistically detailed. We then hand paint each deer head custom to order in our Stewartstown, Pennsylvania studio. Go faux, and be proud to display your new deer friend!
Easy Assembly and Hanging Instructions
1. Line up the Antlers Each antler is labeled with an "R" (right) or "L" (left), which are from the perspective of looking at the deer head-on as if it were hanging on the wall. Lay your deer down and place the right antler in the right antler hole and the left antler in the left hole.
2. Glue Antlers in Place (Optional) We highly recommend that you glue your deer's antlers in place before hanging it. This step is especially important if you're hanging it in a high traffic area or above furniture.
3. Screw into Wall All you need is a strong screw and screw driver (not included). Use a screw over 1" long that has a head that will fit in the keyhole on the back of the deer. It is best to put it in the stud of the wall.
4. Hang Each of our faux animal heads comes with a keyhole on the back. Place the keyhole over the screw that you inserted in step 3.
5. Admire Woohoo! Give yourself a pat on the back and then snap a photo to show off your new deer head to your friends.
Wall Decor to Bring Life to Any Room in Your Home
|
|
|
|
|---|---|---|
Beautiful Bedroom DecorOur faux deer head adds interest to your room. With a variety of colors, you can select the color combination that best matches your decor. Or, opt for a simple white deer head to match with your changing taste. |
Living Room Wall DecorA faux taxidermy deer head hanging in your living room is sure to spark the attention of your guests! Hang it above a book case, china cabinet, comfy sofa, or fireplace mantle to add dimension in a seamless way. |
Baby Nursery Focal pointEvery woodland themed baby nursery needs a faux animal head. Our 8 point deer head adds interest to your walls and will be the beginning of your baby boy or girl's love of animals. |
8 Point Deer Head Measurements
Measurements include Antlers
- 22" tall
- 16.25" wide
- 13" deep
Key Features
- Made of resin (hard surface)
- Removable antlers for storage and shipping
- Hand-painted with love in Stewartstown, PA
- Custom made to order (2-4 business day production time)
- Keyhole on back for easy mounting
|
|
|
|
|
|
|---|---|---|---|---|
| 8 Point Deer | 14 Point Deer | Mini Deer | Moose Head | |
| Height (including antlers) | 22 inches | 21 inches | 15 inches | 21.5 inches |
| Removable antlers | ✓ | ✓ | ✓ | ✓ |
| Keyhole for easy mounting | ✓ | ✓ | ✓ | ✓ |


BEST SELLERS


Menu
-
B2B

-
Shopping Agent
-
Forwarding
-
Support
-
Brand Introduction
-
Login
Sign Out
-
Language English

-
Currency RUB
 Language
Currency
 Drag the image here, or
Click to upload
Tips: Only jpg, jpeg, png, webp
Drag the image here, or
Click to upload
Tips: Only jpg, jpeg, png, webp


Scan the QR code and use your phone to take a direct photo search.
×
