


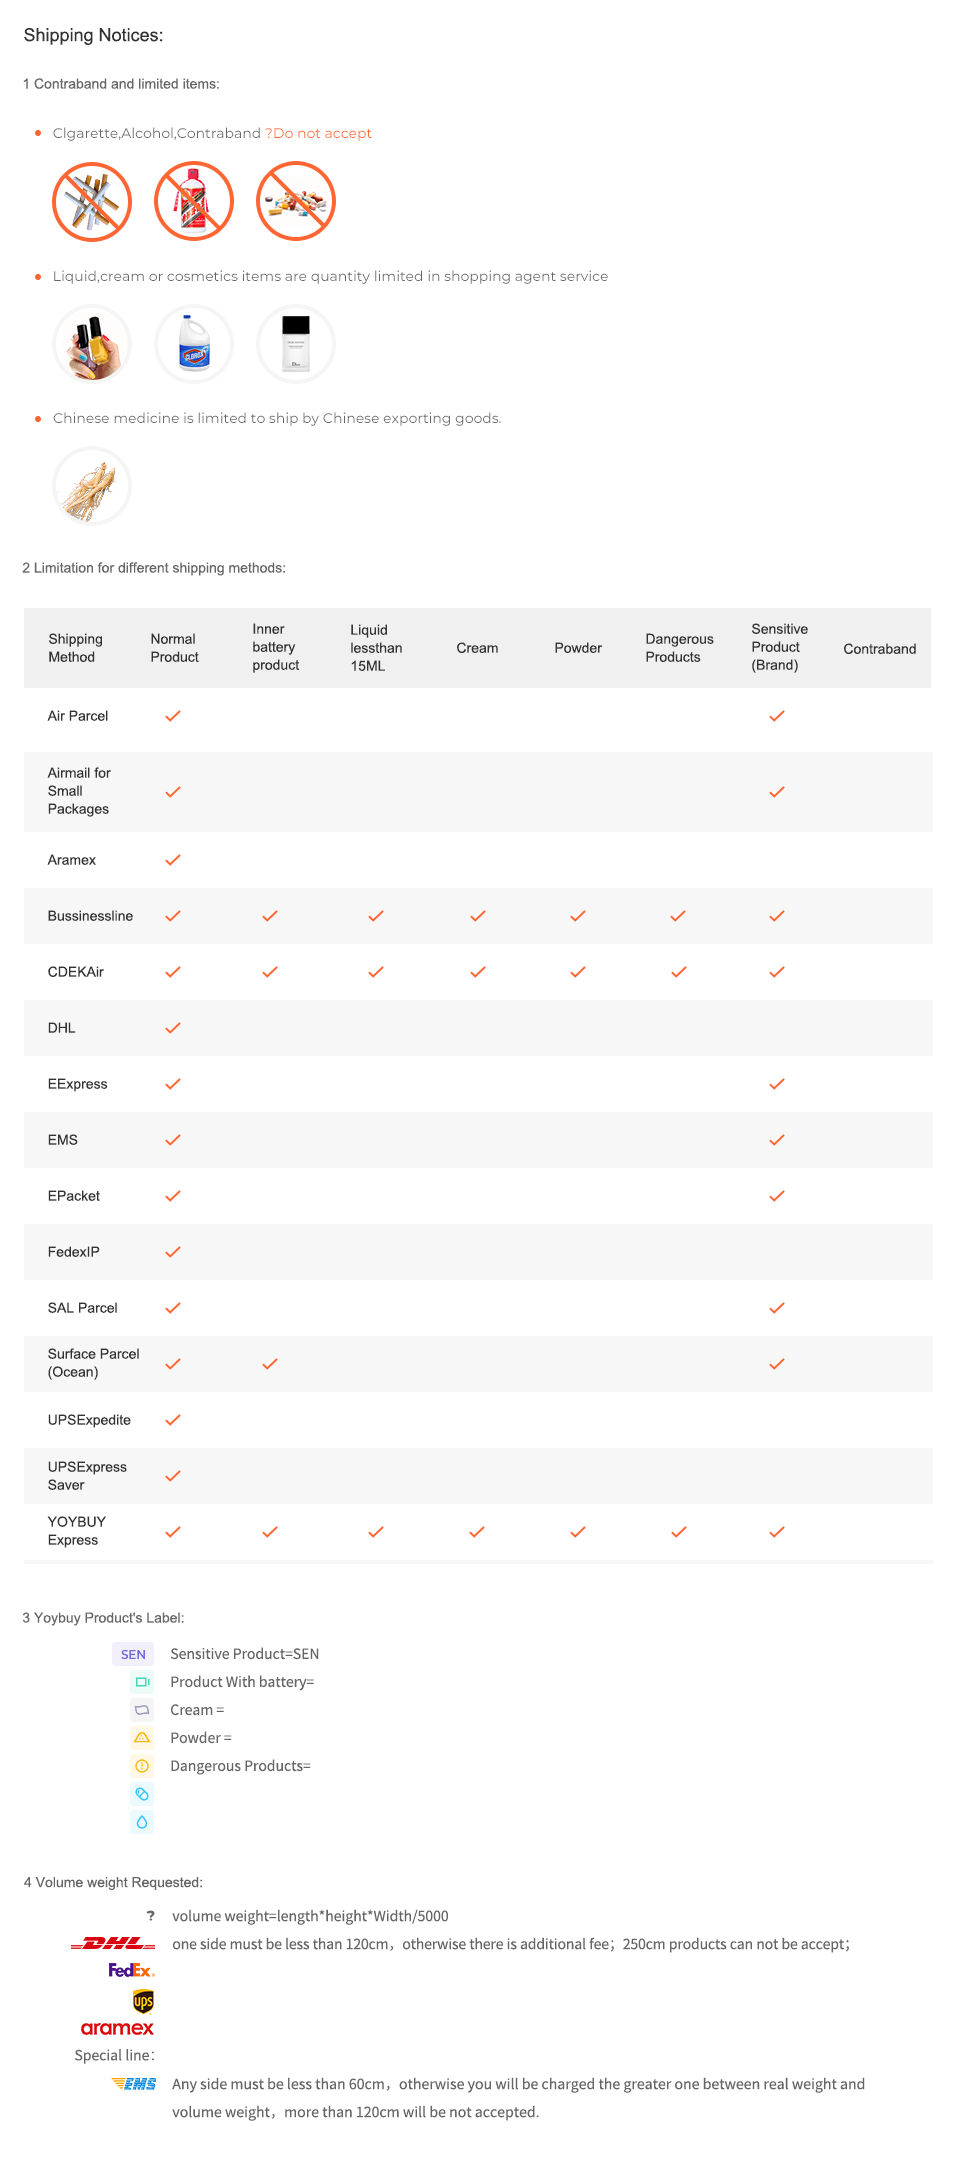
Description:
If you love having beautiful gel nails but don’t want to waste time running to the salon and spending too much money, you can have the best of both worlds with the Ohuhu all-in-one poly nail gel kit. Choose from 12 beautiful colors for any occasion, and be sure you can give yourself the complete treatment with this complete set. You won’t have to wait around for ages because Ohuhu poly nail gel dries quickly and lasts a long time, too! All of the gels in the Ohuhu 12-color poly nail gel kit are made of natural materials and are suitable for any kind of nails. If you’re looking for a great gift for the nail perfectionist in your life, you can be sure they’ll enjoy the Ohuhu nail extension gel kit for all of their beauty needs!

Design your own nail art!
HOW TO USE THE POLY GEL KIT?

HOW TO USE THE POLY GEL KIT?
1. Use the steel pusher to push your cuticles to the edge of the nail.
2. Use the dead skin scissors to cut dead skin, hangnails, etc.
3. File and clean the surfaces and edges of your nails.
4. Apply a thin layer of base coat then cure it under UV / LED lights.
5. Select the appropriate nail form and squeeze the nail gel onto the nail form.
6. Dip brush in cleaning solution or alcohol to prevent sticking.
7. Apply the nail gel onto the nail form.
8. Cure the nail form under UV / LED lights.
9. Remove the nail form.
10. Trim and clean nails with nail clippers and sponge strips.
11. Apply a thin layer of top coat and cure it under UV / LED lights.
12. Finish.

Helpful Tips:
1. Both UV and LED lamps can be used to cure gel. We recommend curing it with UV for about 2 minutes and LED for about 1 minute. The specific curing time depend on the thickness of the nail gel. The thicker the nail gel is, the longer the curing time will be.
2. Cleaning solution can help mold the nail gel. Make sure that the brush is not too dry or too wet when dipping into the cleaning solution.
3. After the nail gel is molded, you can also wipe both sides of the nail with the cleaning solution to remove the sticky layer and make the nail smoother and more shiny.
4. The temperature and the length of the nail will affect the color of the nail gel.
5. When removing your nails, soak them in slip solution or cleaning solution for about 5 minutes, then wipe them with a makeup remover.
6. Making great nail art requires patience. Check out the manual to learn more!

What's included?
12 * 15ml 12-color nail gel
4 * glitter powder
1 * 15ml base coat
1 * 15ml top coat
1 * 30ml cleaning solution
100 * nail form
1 * double-ended brush
1 * nail file
1 * nail clippers
1 * dead skin scissors
1 * steel pusher


BEST SELLERS

Product Description
Description:
If you love having beautiful gel nails but don’t want to waste time running to the salon and spending too much money, you can have the best of both worlds with the Ohuhu all-in-one poly nail gel kit. Choose from 12 beautiful colors for any occasion, and be sure you can give yourself the complete treatment with this complete set. You won’t have to wait around for ages because Ohuhu poly nail gel dries quickly and lasts a long time, too! All of the gels in the Ohuhu 12-color poly nail gel kit are made of natural materials and are suitable for any kind of nails. If you’re looking for a great gift for the nail perfectionist in your life, you can be sure they’ll enjoy the Ohuhu nail extension gel kit for all of their beauty needs!
Design your own nail art!
HOW TO USE THE POLY GEL KIT?
HOW TO USE THE POLY GEL KIT?
1. Use the steel pusher to push your cuticles to the edge of the nail.
2. Use the dead skin scissors to cut dead skin, hangnails, etc.
3. File and clean the surfaces and edges of your nails.
4. Apply a thin layer of base coat then cure it under UV / LED lights.
5. Select the appropriate nail form and squeeze the nail gel onto the nail form.
6. Dip brush in cleaning solution or alcohol to prevent sticking.
7. Apply the nail gel onto the nail form.
8. Cure the nail form under UV / LED lights.
9. Remove the nail form.
10. Trim and clean nails with nail clippers and sponge strips.
11. Apply a thin layer of top coat and cure it under UV / LED lights.
12. Finish.
Helpful Tips:
1. Both UV and LED lamps can be used to cure gel. We recommend curing it with UV for about 2 minutes and LED for about 1 minute. The specific curing time depend on the thickness of the nail gel. The thicker the nail gel is, the longer the curing time will be.
2. Cleaning solution can help mold the nail gel. Make sure that the brush is not too dry or too wet when dipping into the cleaning solution.
3. After the nail gel is molded, you can also wipe both sides of the nail with the cleaning solution to remove the sticky layer and make the nail smoother and more shiny.
4. The temperature and the length of the nail will affect the color of the nail gel.
5. When removing your nails, soak them in slip solution or cleaning solution for about 5 minutes, then wipe them with a makeup remover.
6. Making great nail art requires patience. Check out the manual to learn more!
What's included?
12 * 15ml 12-color nail gel
4 * glitter powder
1 * 15ml base coat
1 * 15ml top coat
1 * 30ml cleaning solution
100 * nail form
1 * double-ended brush
1 * nail file
1 * nail clippers
1 * dead skin scissors
1 * steel pusher


BEST SELLERS


Menu
-
B2B

-
Shopping Agent
-
Forwarding
-
Support
-
Brand Introduction
-
Login
Sign Out
-
Language English

-
Currency RUB
 Language
Currency
 Drag the image here, or
Click to upload
Tips: Only jpg, jpeg, png, webp
Drag the image here, or
Click to upload
Tips: Only jpg, jpeg, png, webp


Scan the QR code and use your phone to take a direct photo search.
×
