


- Weld to Weld Length: 19\" ; Working Length: 31.3\"
- Design to Fits 2002-2004 JEEP LIBERTY 3.7L V6 Engines ONLY
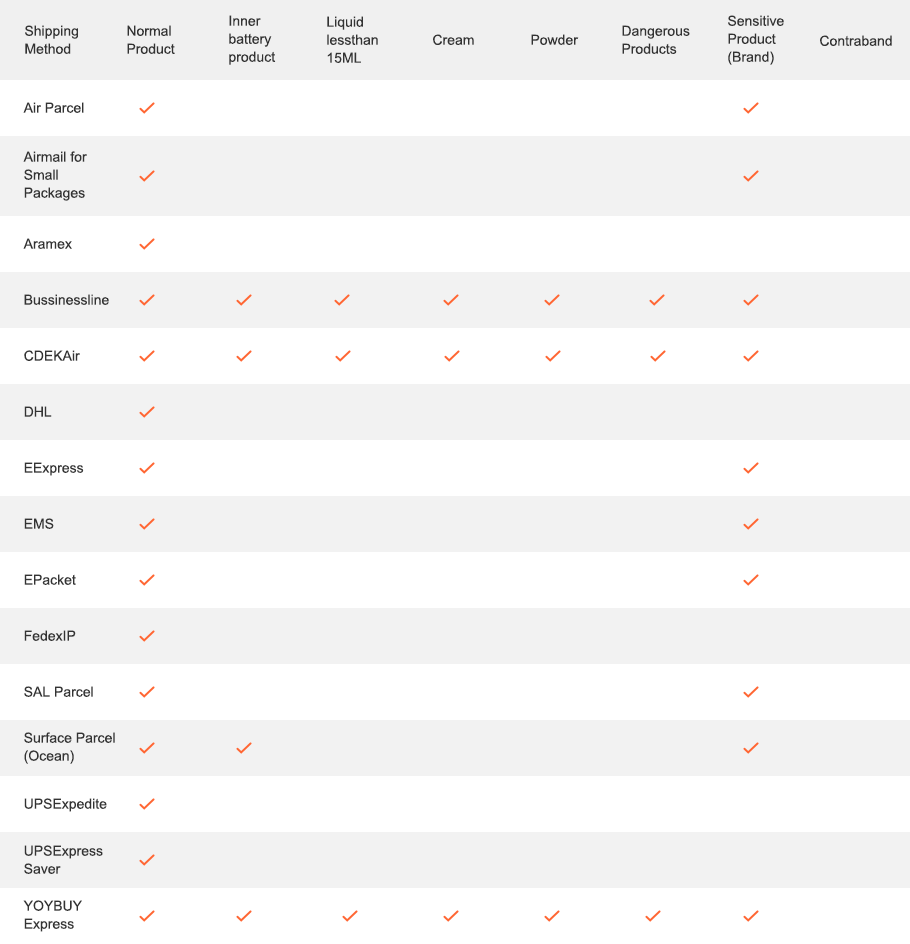
- OEM Replace Number: 52111597AA, 52115597AB
- Direct replacement and ready to install
- Please make sure your drive shaft measures 19 inches from weld to weld!


Specifications
- OEM Refs: 52111597AA / 52115597AB
- Weld to Weld Length: 19"
- Working Length: 31.3"

Description
- Drive Type: RWD
- Material: Steel
- Color: Black
- Surface Finish: Polished, Rust Protected
- Placement on Vehicle: Front
- Interchange Part Number: 52111597AA, 52115597AB
|
|
|
|
|---|---|---|
|
|
|
|


How to Replace Your Drive Shaft?

Removing a Front/Rear Drive Shaft
The procedure of removing a rear drive shaft varies from car to car, but the steps remains the same. Let’s get started with the step-by-step procedure of changing the front & rear drive shaft using a few tools like a hammer and floor jack & jackstays.
1. Mark the Drive Shaft and Remove the Bolts
To know how to remove drive shaft, getting the exact estimation of drive shaft is necessary before beginning the process. Doing so will avoid the driveline vibrations after installing the drive shaft at the right position. After marking the position, remove the shaft by taking out the projection mounting bolts too. Some bolts might have lock tights used to avoid coming loose while working. Pls remove every bolt carefully.
2. Eliminate the Drive Shaft Flange
Drive shaft flange can be easily removed by gently shocking with a plastic hammer. This will result in the half back of the shaft to be free and make sure that the center support is removed, in order to completely remove the shaft flange. Be careful with the U joint cups if you are dealing with an old car, as the chances of falling them out are high. In such cases, use an electric tape to keep the U joint cups at their places as it is counted in the best maintenance tips.
3. Take out the Drive Shaft
Now the drive shaft is completely loose and you can take it out of the car. Use both hands and slide the drive shaft gently from the transmission case. There might be a few liquid leakages so it is preferred to arrange a liquid basin or collector by your side. At this point, you can also fix the leaky transmission tail or universal joints as well. Check the U joint for any fault or damage. Move the U joint in all the directions and check its motion and smoothness. Any roughness can lead the replacement of the joint.
4. Reinstall the Drive Shaft
The last step is to reinstall the new drive shaft but, before going further, apply some grease to the yoke to make the shaft work properly. Carefully place the drive shaft to the marked position. Reinstall the flange bolts too. Finish the installing by ensuring that everything is in the marked position. Now, this is how to remove drive shaft carefully and accurately.


BEST SELLERS

Product Description
Specifications
- OEM Refs: 52111597AA / 52115597AB
- Weld to Weld Length: 19"
- Working Length: 31.3"
Description
- Drive Type: RWD
- Material: Steel
- Color: Black
- Surface Finish: Polished, Rust Protected
- Placement on Vehicle: Front
- Interchange Part Number: 52111597AA, 52115597AB
|
|
|
|
|---|---|---|
|
|
|
|
How to Replace Your Drive Shaft?
Removing a Front/Rear Drive Shaft
The procedure of removing a rear drive shaft varies from car to car, but the steps remains the same. Let’s get started with the step-by-step procedure of changing the front & rear drive shaft using a few tools like a hammer and floor jack & jackstays.
1. Mark the Drive Shaft and Remove the Bolts
To know how to remove drive shaft, getting the exact estimation of drive shaft is necessary before beginning the process. Doing so will avoid the driveline vibrations after installing the drive shaft at the right position. After marking the position, remove the shaft by taking out the projection mounting bolts too. Some bolts might have lock tights used to avoid coming loose while working. Pls remove every bolt carefully.
2. Eliminate the Drive Shaft Flange
Drive shaft flange can be easily removed by gently shocking with a plastic hammer. This will result in the half back of the shaft to be free and make sure that the center support is removed, in order to completely remove the shaft flange. Be careful with the U joint cups if you are dealing with an old car, as the chances of falling them out are high. In such cases, use an electric tape to keep the U joint cups at their places as it is counted in the best maintenance tips.
3. Take out the Drive Shaft
Now the drive shaft is completely loose and you can take it out of the car. Use both hands and slide the drive shaft gently from the transmission case. There might be a few liquid leakages so it is preferred to arrange a liquid basin or collector by your side. At this point, you can also fix the leaky transmission tail or universal joints as well. Check the U joint for any fault or damage. Move the U joint in all the directions and check its motion and smoothness. Any roughness can lead the replacement of the joint.
4. Reinstall the Drive Shaft
The last step is to reinstall the new drive shaft but, before going further, apply some grease to the yoke to make the shaft work properly. Carefully place the drive shaft to the marked position. Reinstall the flange bolts too. Finish the installing by ensuring that everything is in the marked position. Now, this is how to remove drive shaft carefully and accurately.


BEST SELLERS


Menu
-
B2B

-
Shopping Agent
-
Forwarding
-
Support
-
Brand Introduction
-
Login
Sign Out
-
Language English

-
Currency RUB
 Language
Currency
 Drag the image here, or
Click to upload
Tips: Only jpg, jpeg, png, webp
Drag the image here, or
Click to upload
Tips: Only jpg, jpeg, png, webp


Scan the QR code and use your phone to take a direct photo search.
×
