Mossy Oak Graphics Camouflage ATV Wrap, no-fade 3M Vinyl with Matte Finish, ATV or 4 Wheeler, Many Mossy Oak Patterns
  • EASY TO INSTALL. Apply our 4' x 10' single piece camouflage, and simply cut to the shape of your ATV panels. Highly conformable with air release technology for a smooth, bubble-free installation.
  • NO FADE FOR 5 YEARS. Our 3M MCS vinyl means you won't see any fading on this high quality wrap.
  • HIGH QUALITY 3M CAST VINYL. Our cast makes for an easy installation, high resolution patterns, and a long lasting skin that won't peel, shrink or crack.
  • REMOVABLE. When you desire, go ahead and remove our skin, it won't leave behind any adhesive residue.
  • CONFORMABILITY. Our ATV wrap conforms to most ATV's including Can-Am, Outlander, Polaris Sportsman, Honda Pioneer, and Yamaha Grizzly.
color:
  • Winter Brush
Retail Price: $ 180.21
Wholesale Price: Inquire Now
atv

Durable Vinyl Wrap for Any ATV or 4 Wheeler.

Our ATV camo vinyl wrap uses state-of-the-art print technology to produce high definition camouflage patterns and cast materials. Don’t spend a fortune getting camo from the manufacturer. Get the utility of camouflage and the versatility of being able to change patterns based on your intended use. Wrap comes standard in a matte finish, making it ideal for use in the field.

Our ATV camo graphics come as a single piece of camouflage measuring 4’ x 10’. Simply cut the vinyl to the shape of your ATV panels and install. Material is highly conformable and uses air release technology to provide a clean, bubble-free installation. Material is removable when desired and won’t leave behind an adhesive residue.

Conforms to most ATVs, including the Can-Am Outlander, Polaris Sportsman, Honda Pioneer, and Yamaha Grizzly.

DIY

Step-by-Step Installation Guide:

Step 1. Remove racks so that the body of the ATV is exposed and wash ATV thoroughly. Use a wax and grease remover on all application areas.

Step 2. Apply 3M 94 primer to the ATV around the perimeter, the edges, concave and recessed areas. Less is more. This helps with adhesion. Make sure the vehicle is in an environment between 60-95 °F.

Step 3. Measure the vehicle. Think of it in sections: the front, the rear and the gas tank separately. Cut the vinyl to fit these measurements. You only want to apply the vinyl to the smooth surfaces, leaving out the black plastic portions, the motor and the exhaust (anything that heats up with use).

Step 4. Application: Center and secure vinyl into position with masking tape. Start with the top portion of the section, peel off the backing and place. Then do the same with the bottom. Fold the top of the graphic back and make a relief cut down the center to split the graphic in two for the two fenders. Cut and conform around each fender, also making cuts around the gas tank.

Step 5. Apply heat to stretch and conform vinyl to all curves, using pressure to apply the graphic to shape. Use a squeegee tool or fingers to apply pressure. The graphic can be peeled and adjusted as much as needed.

Step 6. Do sections at a time with the same methods as steps 4 and 5.

Step 7. Trim off any excess. Lay the blade flush with the fenders to prevent scratching. Use thumb around edges to conform trimmed edges to curves.

Step 8. After installation: Apply heat and pressure over the graphics to reduce internal stress on the vinyl and ensure proper adhesion. Keep product stored above 60 °F for at least 12 hours to set the adhesive bond.

This website follows the safe harbor principle. If any infringement, please inform us in time and we will delete it in time. About safe harbor,please click here to learn more.
...
After Sale Service:
1 Insurance Policy: Click to go to the Help Center to view the Insurance Policy
2 The rules apply and summit for receive compensation
3 The conditions of accrual for amount insurance
5 Damage to the parcel during international shipping, which resulted in damage to the goods in it
6 Loss of individual goods under international shipment The absence individual goods in the parcel
7 Non-compliance individual goods in color, size, complications Damage to the goods during international shipment
8 Returns Policy: Click to go to the Help Center to view the Returns Policy
...
...
Mossy Oak Graphics Camouflage ATV Wrap, no-fade 3M Vinyl with Matte Finish, ATV or 4 Wheeler, Many Mossy Oak Patterns

BEST SELLERS

...
Mossy Oak Graphics uses the latest technology and highest quality materials to deliver the most advanced camouflage vinyl wraps, skins, decals, and graphics on the market. They are a great product for dressing up your vehicle with high quality camouflage appointments. They will make your ride stand out and show everyone your passion. The items are made of highly durable 3M vinyl and licensed by Mossy Oak, the world's leading camouflage brand. The product is guaranteed not to fade, shrink, peel, or crack in the outdoor elements for up to five years. Place them on any flat, firm, dirt free surface.

From the manufacturer

atv

Durable Vinyl Wrap for Any ATV or 4 Wheeler.

Our ATV camo vinyl wrap uses state-of-the-art print technology to produce high definition camouflage patterns and cast materials. Don’t spend a fortune getting camo from the manufacturer. Get the utility of camouflage and the versatility of being able to change patterns based on your intended use. Wrap comes standard in a matte finish, making it ideal for use in the field.

Our ATV camo graphics come as a single piece of camouflage measuring 4’ x 10’. Simply cut the vinyl to the shape of your ATV panels and install. Material is highly conformable and uses air release technology to provide a clean, bubble-free installation. Material is removable when desired and won’t leave behind an adhesive residue.

Conforms to most ATVs, including the Can-Am Outlander, Polaris Sportsman, Honda Pioneer, and Yamaha Grizzly.

DIY

Step-by-Step Installation Guide:

Step 1. Remove racks so that the body of the ATV is exposed and wash ATV thoroughly. Use a wax and grease remover on all application areas.

Step 2. Apply 3M 94 primer to the ATV around the perimeter, the edges, concave and recessed areas. Less is more. This helps with adhesion. Make sure the vehicle is in an environment between 60-95 °F.

Step 3. Measure the vehicle. Think of it in sections: the front, the rear and the gas tank separately. Cut the vinyl to fit these measurements. You only want to apply the vinyl to the smooth surfaces, leaving out the black plastic portions, the motor and the exhaust (anything that heats up with use).

Step 4. Application: Center and secure vinyl into position with masking tape. Start with the top portion of the section, peel off the backing and place. Then do the same with the bottom. Fold the top of the graphic back and make a relief cut down the center to split the graphic in two for the two fenders. Cut and conform around each fender, also making cuts around the gas tank.

Step 5. Apply heat to stretch and conform vinyl to all curves, using pressure to apply the graphic to shape. Use a squeegee tool or fingers to apply pressure. The graphic can be peeled and adjusted as much as needed.

Step 6. Do sections at a time with the same methods as steps 4 and 5.

Step 7. Trim off any excess. Lay the blade flush with the fenders to prevent scratching. Use thumb around edges to conform trimmed edges to curves.

Step 8. After installation: Apply heat and pressure over the graphics to reduce internal stress on the vinyl and ensure proper adhesion. Keep product stored above 60 °F for at least 12 hours to set the adhesive bond.

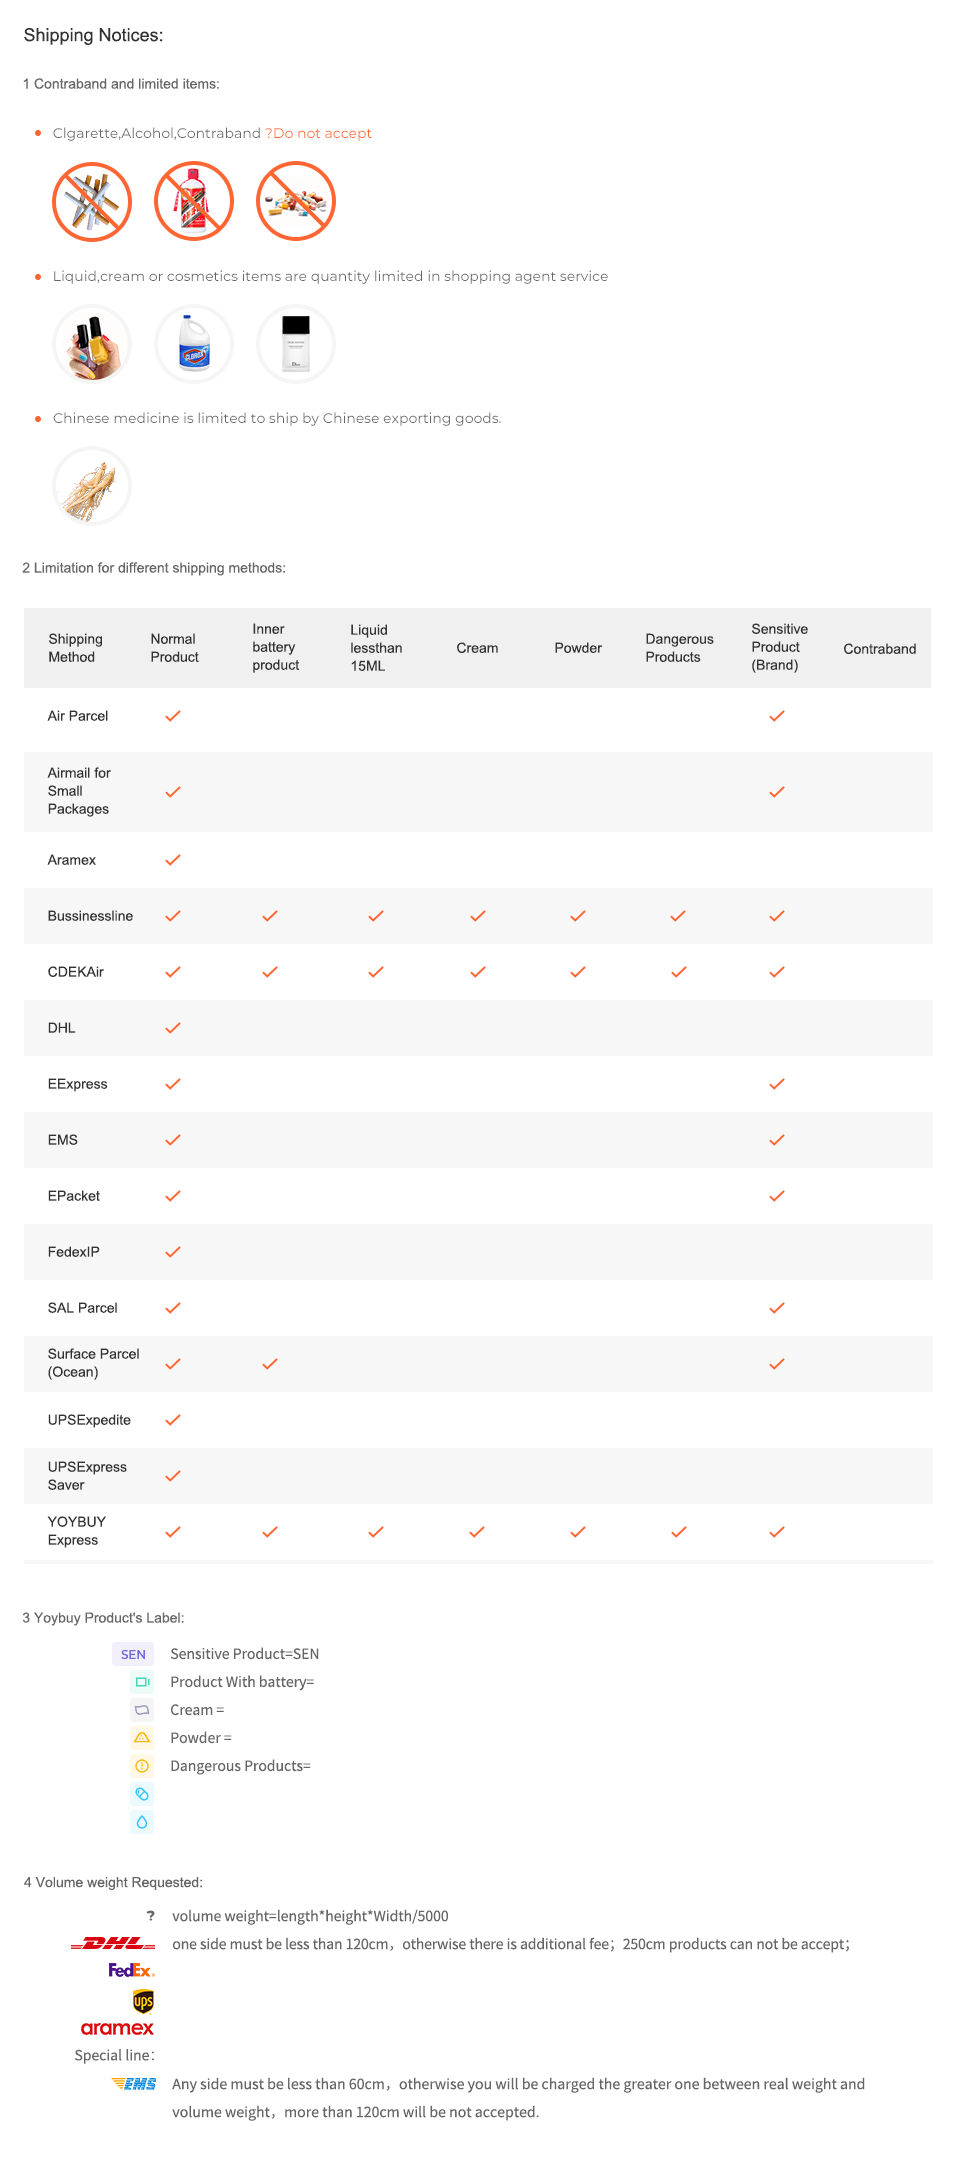
Shipping Notices:
1 Contraband and limited items:
Clgarette,Alcohol,Contraband ?Do not accept
... ... ...
Liquid,cream or cosmetics items are quantity limited in shopping agent service
... ... ...
Chinese medicine is limited to ship by Chinese exporting goods.
...
2 Limitation for different shipping methods:
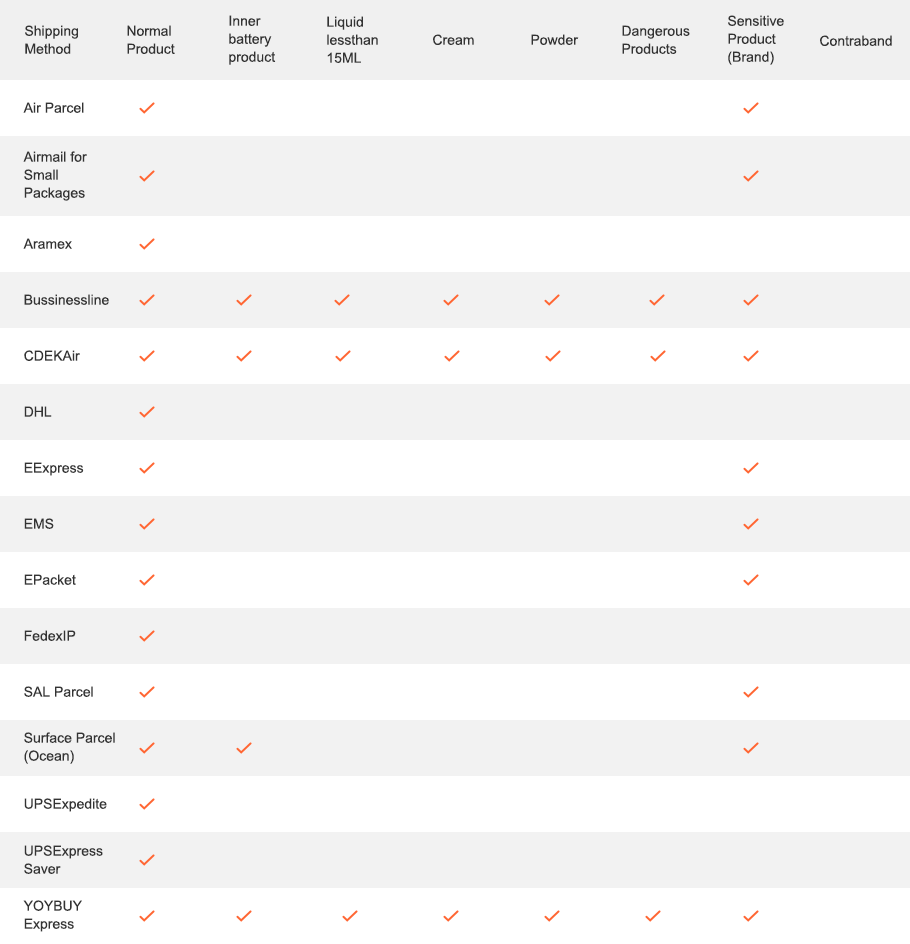
...
3 Yoybuy Product's Label:
...
Sensitive Product(SEN)
...
Product With battery
...
Cream
...
Powder
...
Dangerous Products
...
....
4 Volume weight Requested:
...
volume weight=length*height*Width/5000
...
one side must be less than 120cm,otherwise there is additional fee;250cm products can not be accept;
...
...
...
...
...
Any side must be less than 60cm,otherwise you will be charged the greater one between real weight and volume weight,more than 120cm will be not accepted.
After Sale Service:
2 The rules apply and summit for receive compensation
3 The conditions of accrual for amount insurance
5 Damage to the parcel during international shipping, which resulted in damage to the goods in it
6 Loss of individual goods under international shipment The absence individual goods in the parcel
7 Non-compliance individual goods in color, size, complications Damage to the goods during international shipment
...

BEST SELLERS

Inquire Now
X

Contact us now

Language

Currency

    Upload image to find the same item

    Drag the image here, or Click to upload Tips: Only jpg, jpeg, png, webp

    Scan the QR code and use your phone to take a direct photo search.

    ×