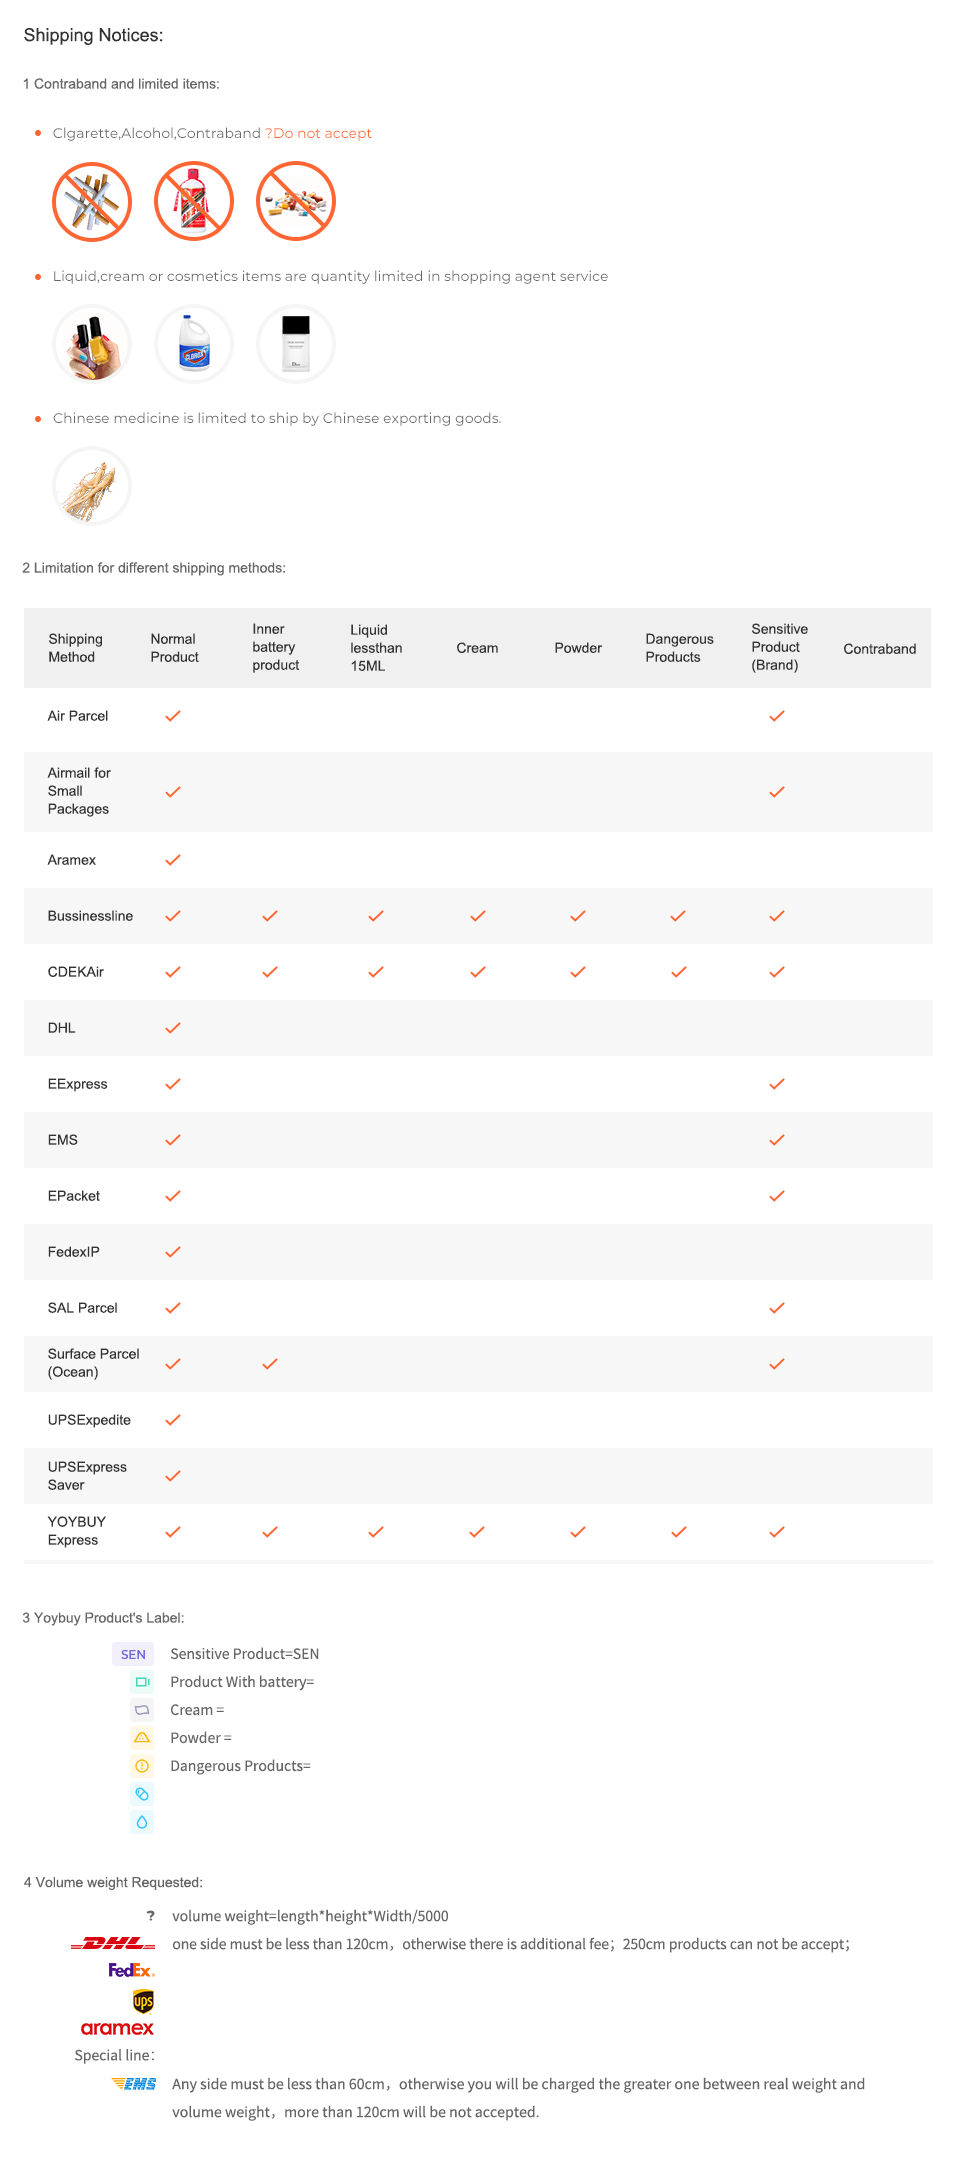
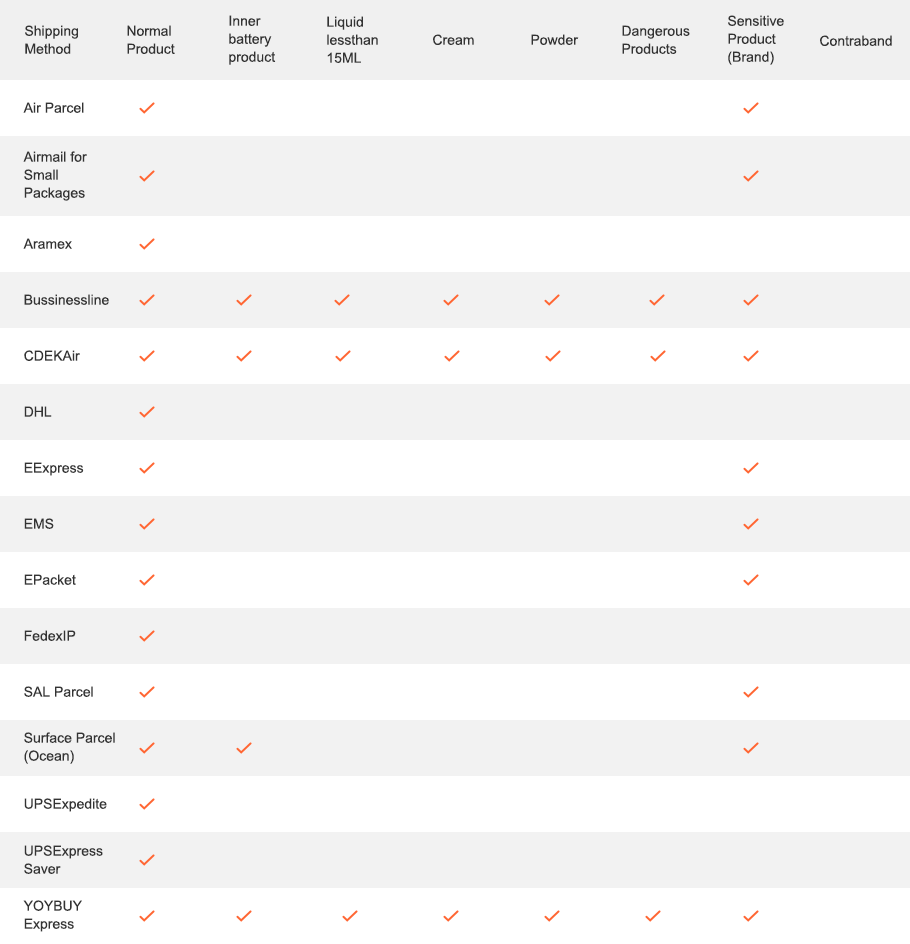
NVX Car Sound Deadening Kit [20 sq feet 5-Sheet Bulk Pack] for Trunk [SDTK20]
  • Significantly eliminates road noise producing higher quality sound from your audio system
  • Up to 30% thicker than the other brands providing best dampening kit value
  • With 20 square feet of material, enough to cover all problem areas bothering you for so long
  • Significantly reduces rattle and vibrations from heavy bass
  • Four step peel and stick design for easy installation
size:
  • 20 sq feet
color:
  • silver
Retail Price: $ 59.99
Wholesale Price: Inquire Now
NVX Professional Grade 90mil Sound Damping/Deadening Kit (Black, 40sqft) Dynamat 10455 18" x 32" x 0.067" Thick Sound Deadener
Total Sq. Ft. 40 Sq. Ft. 36 Sq. Ft.
Total Thickness 2.3mm 1.7mm
Material 100% Butyl Rubber & Aluminum Foil Butyl Rubber & Aluminum Foil
Self-Adhesive Back
Dimensions Ten Sheets: 18" x 32" Nine Sheets: 18" x 32"
Cost 99.95 160.99
NVX SDBBP40 Premium Stealth Black Premium Sound Deadening Bulk Pack 40 Square feet (Entire Car)

How to Install Sound Damping Properly

Sound damping can be a very beneficial accessory to reduce noise and vibration. To take full advantage of this soundproofing, read these instructions carefully and follow them till the end. It’s important to familiarize yourself with all the details to install the sound damping correctly. Incorrect installation will result in less than desirable results.

Step #1

The first step is to decide which location in your car you want to insulate. These locations include the floorboards, roof, door panels, trunk or firewall. We recommend soundproofing all metal surfaces for maximum sound deadening performance. Next, refer to your vehicle’s service manual for information on how to dismantle the trimming panels. Be careful when removing the panels to avoid breaking the fixing clips.

Step #2

Once the trimming is dismantled, remove the remainder of the factory insulation if it is damaged. If it is still intact, there is no need to permanently remove it. Next, you need to properly clean, dry and degrease the prospective surface. Sound deadening won't adhere properly if applied to a wet or dirty surface. Use a metal surface cleaner or degreaser along with a dry, clean rag. Make sure to use gloves and apply the degreaser in a well-ventilated space.

Step #3

For this step, measure the prospective surface you are going to treat. To make things easier, make a template of the appropriate size on a large sheet of paper and then transfer it to the damping material. That will make it easier to install it more accurately and avoid wasting material. Use a utility knife to cut the desired shape and size. Be careful and use gloves to protect your hands.

Step #4

Place a sheet of sound damping to the surface without removing the protective film. If it covers the surface properly, you are ready to install it. Gradually remove the protective paper film as you apply it to the surface for better adhesion. Once on the surface, press it down firmly until it is set in place. Flatten it with your hands to avoid unnecessary air bubbles. Use a rolling tool like the NVX SDRLR1 to press the mat down to the metal surface. Go across the entire surface with the roller to ensure that the sheet is installed properly.

Step #5

Once all sound deadening is in place, simply reinstall all trim pieces and carpet back to its original placement. Now you are ready to enjoy higher sound quality with fewer vibrations.

This website follows the safe harbor principle. If any infringement, please inform us in time and we will delete it in time. About safe harbor,please click here to learn more.
...
After Sale Service:
1 Insurance Policy: Click to go to the Help Center to view the Insurance Policy
2 The rules apply and summit for receive compensation
3 The conditions of accrual for amount insurance
5 Damage to the parcel during international shipping, which resulted in damage to the goods in it
6 Loss of individual goods under international shipment The absence individual goods in the parcel
7 Non-compliance individual goods in color, size, complications Damage to the goods during international shipment
8 Returns Policy: Click to go to the Help Center to view the Returns Policy
...
...
NVX Car Sound Deadening Kit [20 sq feet 5-Sheet Bulk Pack] for Trunk [SDTK20]

BEST SELLERS

...

Product Description

NVX Professional Grade 90mil Sound Damping/Deadening Kit (Black, 40sqft) Dynamat 10455 18" x 32" x 0.067" Thick Sound Deadener
Total Sq. Ft. 40 Sq. Ft. 36 Sq. Ft.
Total Thickness 2.3mm 1.7mm
Material 100% Butyl Rubber & Aluminum Foil Butyl Rubber & Aluminum Foil
Self-Adhesive Back
Dimensions Ten Sheets: 18" x 32" Nine Sheets: 18" x 32"
Cost 99.95 160.99
NVX SDBBP40 Premium Stealth Black Premium Sound Deadening Bulk Pack 40 Square feet (Entire Car)

How to Install Sound Damping Properly

Sound damping can be a very beneficial accessory to reduce noise and vibration. To take full advantage of this soundproofing, read these instructions carefully and follow them till the end. It’s important to familiarize yourself with all the details to install the sound damping correctly. Incorrect installation will result in less than desirable results.

Step #1

The first step is to decide which location in your car you want to insulate. These locations include the floorboards, roof, door panels, trunk or firewall. We recommend soundproofing all metal surfaces for maximum sound deadening performance. Next, refer to your vehicle’s service manual for information on how to dismantle the trimming panels. Be careful when removing the panels to avoid breaking the fixing clips.

Step #2

Once the trimming is dismantled, remove the remainder of the factory insulation if it is damaged. If it is still intact, there is no need to permanently remove it. Next, you need to properly clean, dry and degrease the prospective surface. Sound deadening won't adhere properly if applied to a wet or dirty surface. Use a metal surface cleaner or degreaser along with a dry, clean rag. Make sure to use gloves and apply the degreaser in a well-ventilated space.

Step #3

For this step, measure the prospective surface you are going to treat. To make things easier, make a template of the appropriate size on a large sheet of paper and then transfer it to the damping material. That will make it easier to install it more accurately and avoid wasting material. Use a utility knife to cut the desired shape and size. Be careful and use gloves to protect your hands.

Step #4

Place a sheet of sound damping to the surface without removing the protective film. If it covers the surface properly, you are ready to install it. Gradually remove the protective paper film as you apply it to the surface for better adhesion. Once on the surface, press it down firmly until it is set in place. Flatten it with your hands to avoid unnecessary air bubbles. Use a rolling tool like the NVX SDRLR1 to press the mat down to the metal surface. Go across the entire surface with the roller to ensure that the sheet is installed properly.

Step #5

Once all sound deadening is in place, simply reinstall all trim pieces and carpet back to its original placement. Now you are ready to enjoy higher sound quality with fewer vibrations.

Shipping Notices:
1 Contraband and limited items:
Clgarette,Alcohol,Contraband ?Do not accept
... ... ...
Liquid,cream or cosmetics items are quantity limited in shopping agent service
... ... ...
Chinese medicine is limited to ship by Chinese exporting goods.
...
2 Limitation for different shipping methods:
...
3 Yoybuy Product's Label:
...
Sensitive Product(SEN)
...
Product With battery
...
Cream
...
Powder
...
Dangerous Products
...
....
4 Volume weight Requested:
...
volume weight=length*height*Width/5000
...
one side must be less than 120cm,otherwise there is additional fee;250cm products can not be accept;
...
...
...
...
...
Any side must be less than 60cm,otherwise you will be charged the greater one between real weight and volume weight,more than 120cm will be not accepted.
After Sale Service:
2 The rules apply and summit for receive compensation
3 The conditions of accrual for amount insurance
5 Damage to the parcel during international shipping, which resulted in damage to the goods in it
6 Loss of individual goods under international shipment The absence individual goods in the parcel
7 Non-compliance individual goods in color, size, complications Damage to the goods during international shipment
...

BEST SELLERS

Inquire Now
X

Contact us now

Language

Currency

    Upload image to find the same item

    Drag the image here, or Click to upload Tips: Only jpg, jpeg, png, webp

    Scan the QR code and use your phone to take a direct photo search.

    ×